
When I first finished install Linux Mint for my primary use, I thought it is done. There is nothing else that can be done to change the way it looks. This is the typical feeling for users who worked with Windows or Mac for too long. Then I saw all the screenshots from users that has customized their desktops. They are beautiful. And they are personal, reflecting the aesthetic tastes of the owner. It is hard not to be envious about these customization. So I decided I need to do the same, ditch the default looks and have something more personal.
The desktop I have is XFCE, and it is a bit harder to customize this. And I finally figured out how to do it. I don't think there is a tutorial like this one online. So, please bookmark this page and try the tips and tricks discussed in this tutorial. Thank you for reading and enjoy.
I have Linux Mint, with XFCE as the desktop. Initially, it looks like the typical Windows XP/7/10. I have done some minor customization of the desktop, with Plank and a solid colored panel. The panel used to list all the applications as launchers, then I customized plugins to be displayed. It was OK, but not pretty. After seeing some of the more sophisticated customization, I decided it would be a good idea for me to try doing something similar.
This is the first customization I have tried. Purely by coincidence, I found the site called store.kde.org, and inside this site, there is a section called "Plymouth Themes". Plymouth is a little application that runs during boot-up and shutting down and show the splash window. Before you do the changes using my approach, please make sure that your system also uses Plymouth during boot-up and shutting down. For my desktop, Plymouth was part of it, so it is possible to get the new splash window display and just install it.
At this store.kde.org, there are 493 themes. I installed about 6 or 7 different ones. And finally settled with the one called Double Plymouth Theme. The way it is done with the following steps:
This is the command install the theme:
sudo update-alternatives --install /usr/share/plymouth/themes/default.plymouth default.plymouth /usr/share/plymouth/themes/<new theme>/<new theme>.plymouth 100
This is the command that configures the new theme to be used:
sudo update-alternatives --config default.plymouth
There will be a list of theme to choose from, find the index number associated with the new theme. Type it and press enter.
At last, I have to run this command to bind the new theme to the shut down process so that during shut down, the same splash display can be shown:
sudo update-initramfs -u
This link describe the installation processing in steps. It helped me install the very first one. Just to let you know, the commands are not entirely necessary. Some of these themes have install scripts and makes the above steps obsolete. So check the install instruction before running the commands.
The boot-up and shut down spinner/splash window theme I chose is called the "Double Plymouth Theme". I cannot stand the Linux Mint boot up/shot down splash window. It is just a boring green coin like spinner. If I could replace it, I would replace it. Turned out I can, so I decided to use this new theme as the boot up and shut down theme:

This theme is very easy to install. All I have to do is uncompress it and run the command under the uncompressed folder:
./install.sh
This install script encapsulate all the steps described above. This is why it is so easy to install a well packaged start-up/shut down theme. After the installation, it will display a 5 seconds preview. If it shows then it is installed correctly. If it failed with some error, you might have to re-install the whole OS. But first reboot and see if it works.
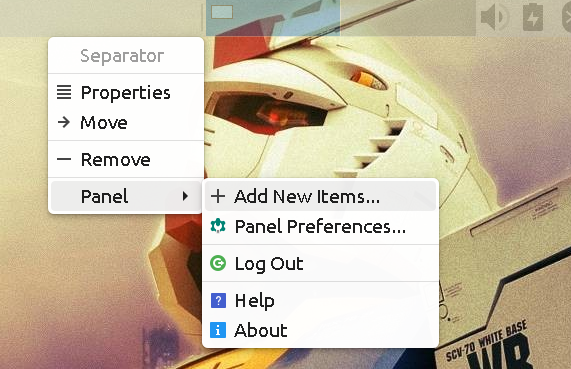
Customizing XFCE panel is quite confusing. I guess I have been using Windows for too long. XFCE panel by design is confusing. Here is the context menu (expanded) when you right click on the XFCE panel. As you can see, there is a "Properties" option. Under the sub-menu for "Panel", there is also the option called "Panel Preferences"?

Which one is the option to edit Panel properties/preference? At first I was very confused as which one it is, and I would click "Properties". But it should be that one under the sub menu called "Panel Preferences". Click on this option to open the Preferences dialog. It looks like this:
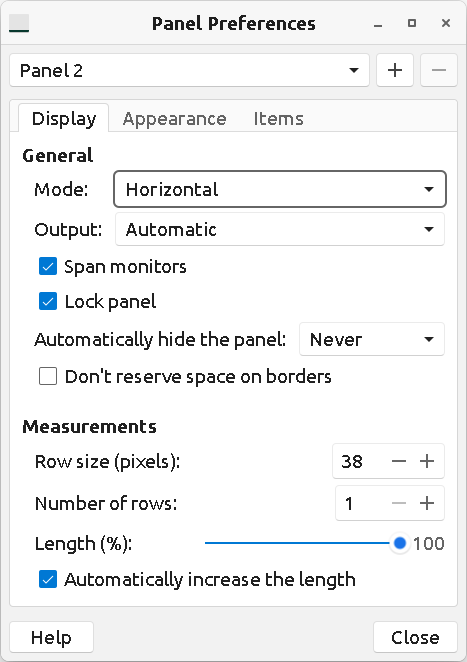
To set the panel transparent, select the tab called "Appearance".
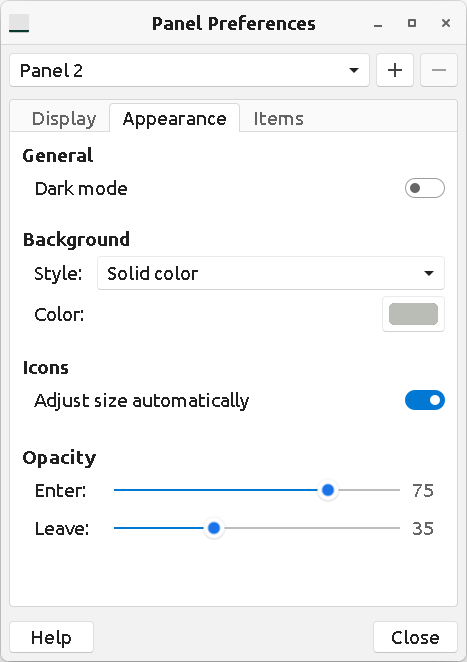
In the section called "Background", the style should be set as "Solid". The color should be one that you like the best, I just use gray. For the section "Icons", I set it on for "Adjust Size Automatically". The last section "Opacity" will define whether the panel is transparent or not. There are two adjustable slides. The top one defines the opacity when the mouse cursor is on top of the panel. This is the in-focus mode, I like it to be less transparent. So the opacity is set to 75%. The bottom one is to set the opacity of the panel when the mouse cursor is not on the panel, as in out of focus mode. This I like it to be more transparent. It is why I set the opacity as 35%. Once set, if the panel does not display the difference. I would use killall command to shut down the panel. Then restart it:
killall xfce4-panel

xfce4-panel &
Once restarted, the panel should be transparent out of focus, and when mouse moves on top, it will become more opaque.

That is how I configured the panel to be transparent.
Creating a launcher is like creating a shortcut in Windows desktop. But the interface to create one is different from the Windows version. This is why I made this section, to show how it is done. It is also necessary because I need to make an icon shortcut for lock screen. Apparently this is part of the start-up menu. But there is no launcher for it and I had to made it my own so that I can stick it on the top panel. Here it is:

It took me a long time to figure out how to add such an icon so that I can one mouse click to lock the screen. If you are a keyboard guy, the keyboard short cut is CTRL + ALT + L. And there is a terminal command for this:
xflock4
This is how you can add a new lock-screen launch button on the top panel. Right click on the empty space in the top panel, which shows the context menu. At the bottom of this context menu, there is the "Panel" option click it and the sub-menu shows. The top option in the sub-menu is "Add New Items...". This is the screenshot:
Click "Add New Items..." to open the dialog for adding a new item:
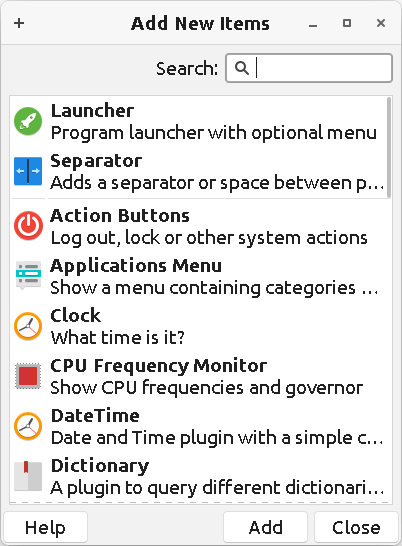
The top item in the dialog "Launcher" is the one I click. Then the launcher will le add to the top right corner of the panel. Like this:
This is where it gets inconvenient. Rather than open another dialog so that I can specify what application to run, it just closes the dialog. And I have to go the newly created launch button/icon on the panel and specify the application. Right click on the button/icon to open the context menu:
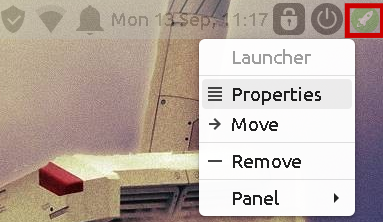
I click on the option called "Properties", which will pop open another small dialog so that I can specify what application to run. The dialog looks like this:
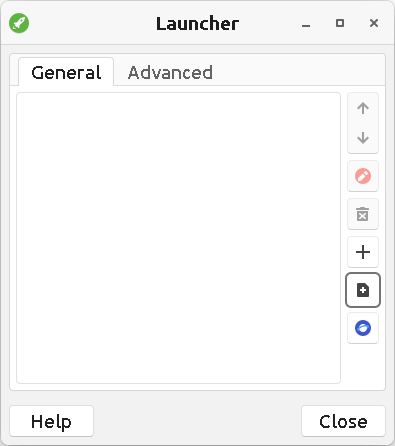
On above screenshot, the "+" button will allow you to add any standard applications to the launcher. These apps are the one you can get from the start menu. I need to add a command line to the launcher, which cannot be done with this button. The button below this one is the one to click. It is called "Add a new empty item". Click it and it will popup another dialog, called "Create Launcher". It looks like this
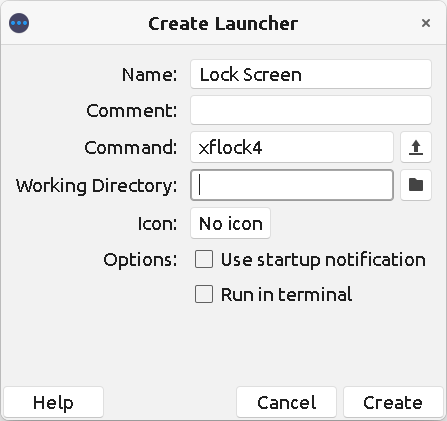
I have filled in the two input boxes. One is the "Name". The other is the third line called "Command". To lock the screen, I type in the command xflock4. The last action before click the button "Create" to save the changes is click the button that is called "No icon". Give it a good icon that represent the lock screen action. Once clicked, it will take many seconds to open the "Select an icon" window, like this:
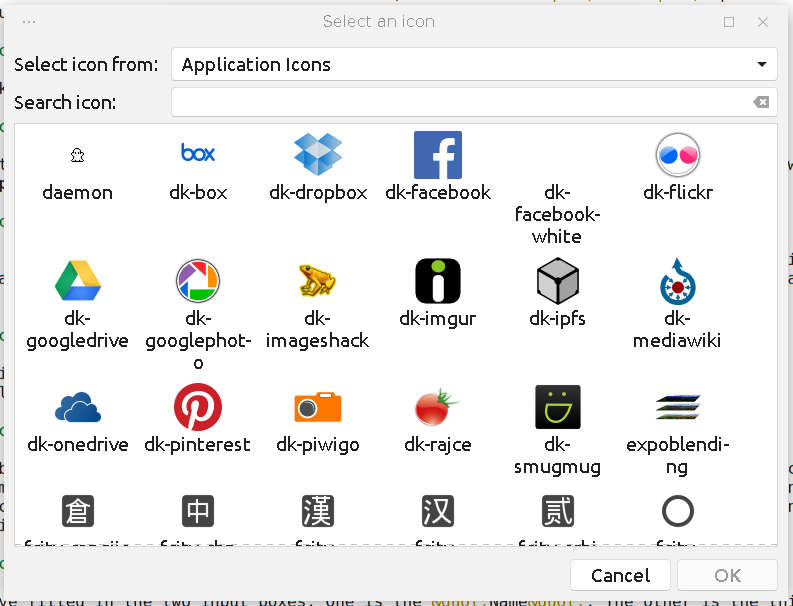
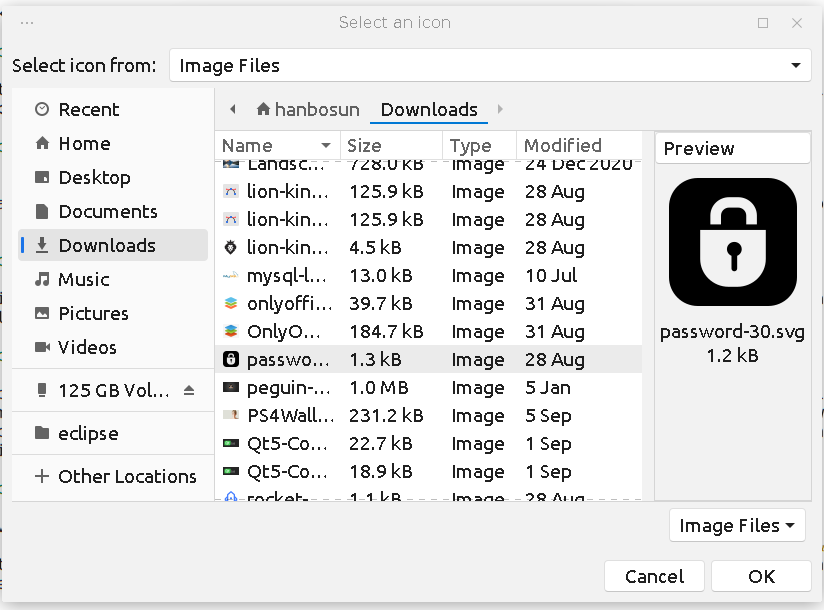
The window will categorize all the icons. The top drop down input allow you to filter based on category. But if you want to select an icon in you local folder, click the drop down and select "Image Files" And following instructions to choose an icon file from your local folders. The lock screen icon/button I have uses a custom icon of SVG format. You should get an icon with SVG format as well. Alternatively you can use PNG/JPEG format. They are not resizeable well than the SVG format.
Click "OK" to confirm selected icon file. Then click "Create" on the "Create Launcher" dialog. Now the new launcher will be visible on the top panel at the righ most position.
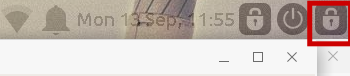
Try it out by clicking it. It should lock your screen. And you have to enter password then enter to get back to the desktop. If you cannot get it to work, re-read this section again and try again. You should be able to remove this button/icon from panel by right click on it, then select "Remove" to remove it. If you want to reposition this to a different location on the same panel, right click on it and select "Move" and dragging it to the right location on panel, then release.
Why do I need a custom icon? That is because the icon I wanted a white lock under the black ground is not available in the icon set I installed. So I had to go to the free icon site, download the one I like, which is what you see here and use it for the lock screen launcher.
I tried Cairo dock, plank, and one other. And all of these ended with disappointment. The best one of these 3 is Plank. However, the development and maintenance is no longer active. There are two issues with Plank:
Then I saw an article recommending a bunch of applications dock and found DockBarX as a good alternative. Again, this project is discontinued. But someone forked it in a different repository and is actively maintaining it. And I was able to install it. It has a GIT repository which provided detail instructions for installation. Click here to view.
Linux Mint is a fork of Ubuntu Linux. That means I can just use the install instructions described in the GIT repository page and install it:
WondowsFirst, these 3 commands will add the DockBarX apt repository, then install it.
sudo add-apt-repository ppa:xuzhen666/dockbarx
sudo apt-get update
sudo apt-get install dockbarx
I do not care about turning XFCE panel into a dock bar. So I chose not to run the next command:
sudo apt-get install xfce4-dockbarx-plugin
But I want the extra themes, so I run this command:
sudo apt-get install dockbarx-themes-extra
After installation, you can get to the application and configuration via the start menu, then search with text "dock". And these will show, the highlighted two apps:
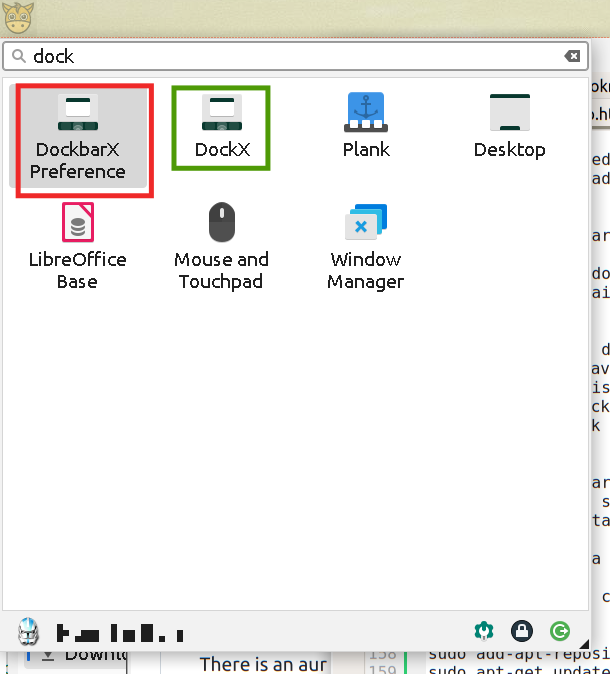
The first one in red bordered rectangle is the preferences application for DockBarX. The other one in green bordered rectangle is the application launcher for DockBarX. You can also run it in terminal using command:
dockx &
Before you run it, you might want to shut down the previously running dock bar application. I would use terminal with the command:
killall <program command>
For example, if I want to kill Plank, I would do this:
killall plank
Once the existing dock bar application is gone, click the application called "DockX", and the dock application will appear. It would look pretty ugly first. Some more customization will make it fairly pretty. Here is what I did, Open the application called "DockbarX Preference".
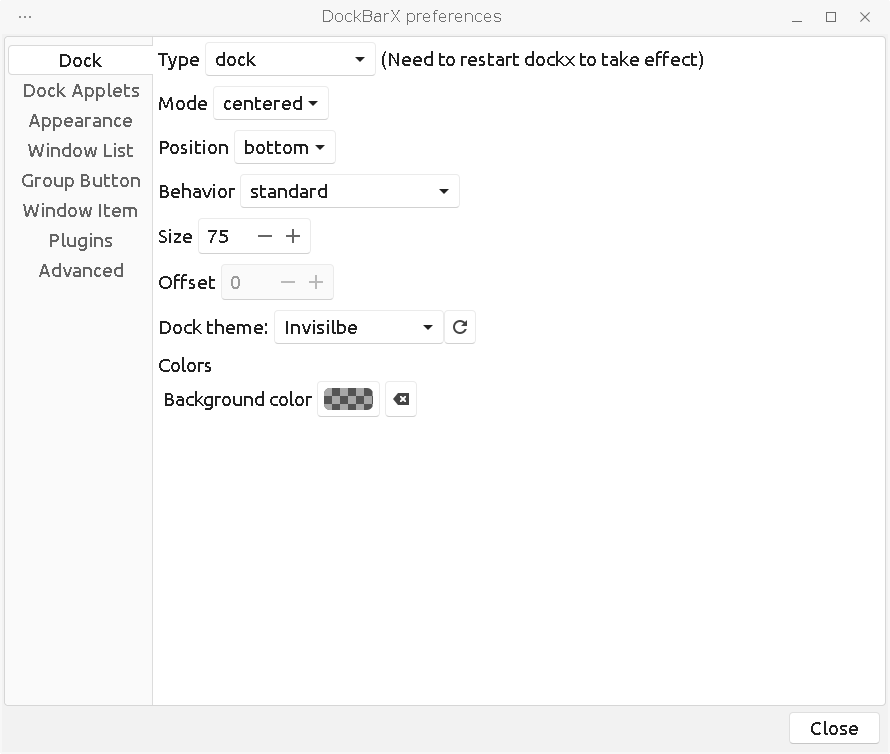
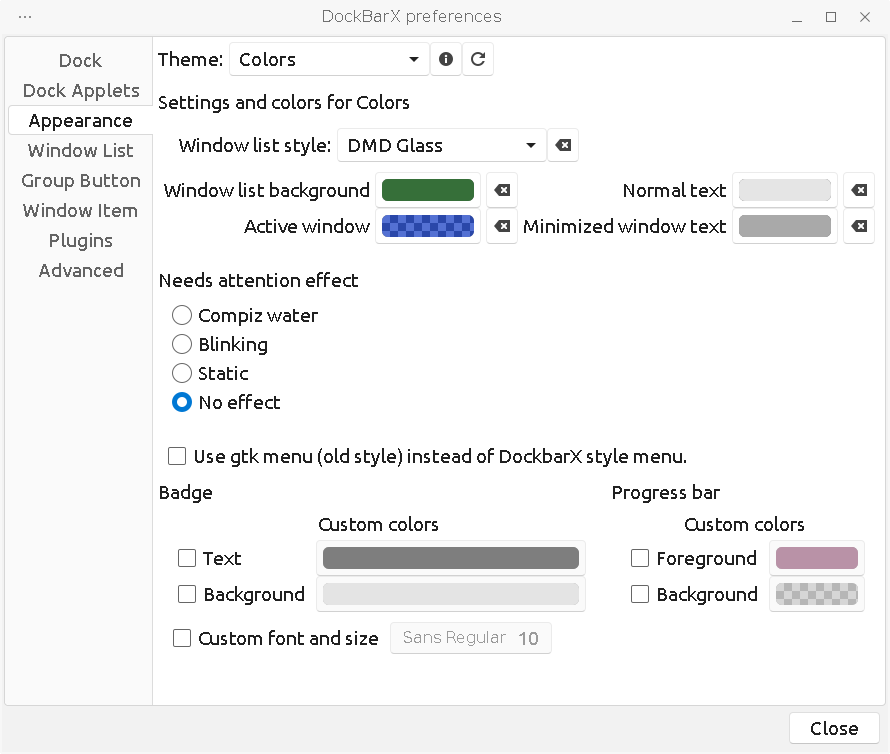
There are quite a lot of options you can set. This could make the customization difficult. The above screenshot shows my configuration for the section called "Dock". This below screenshot shows my configuration for the section called "Appearance".
Once I saved the changes by close this Preference window, the new look should be available, if not using "killall dockx" to terminate it, then restart it.
If you see nothing at the bottom, that means you have no application running, and once you run a few application you will see the dock bar application appear at the bottom. You can right click the icon on the dock bar of the application running, and pin/unpin from the dock bar. Alternatively, you can right click on the right side of the right-most icon on the dock bar, and select "Make custom launcher" to add new applications on the dock bar. To launch the application, single click the icon on the dock bar. Right click on the application icon, then select the Launch Application can start a new window of the same application. Hover the mouse cursor on the application icons can show previews of active windows, and you can select the one you want. This is one step further than Plank, and similar to Windows preview popup. This made this DockBarX extremely friendly. Here is a screenshot of my dock bar:
Adding DockBarX to Session Start
Unfortunately, install DockBarX does not adding it to the startup application list when session starts. You have to add it manually. Open Start menu, and use the search functionality to find the system application called "Session and Start-up".
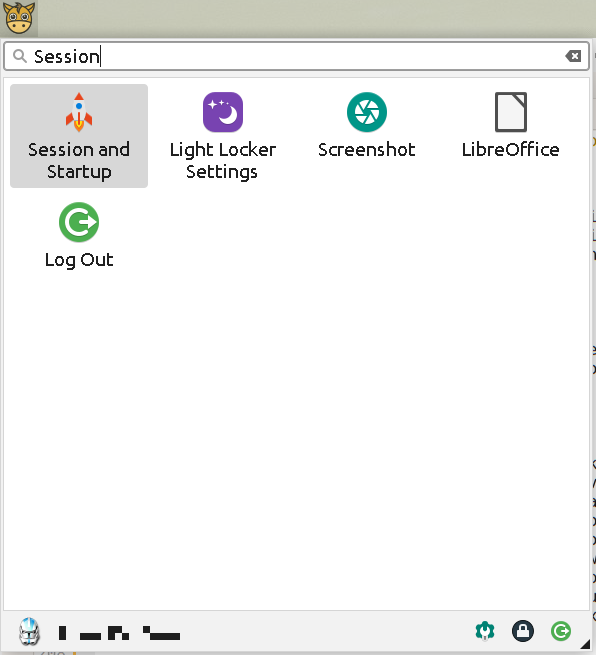
Click it to open it.
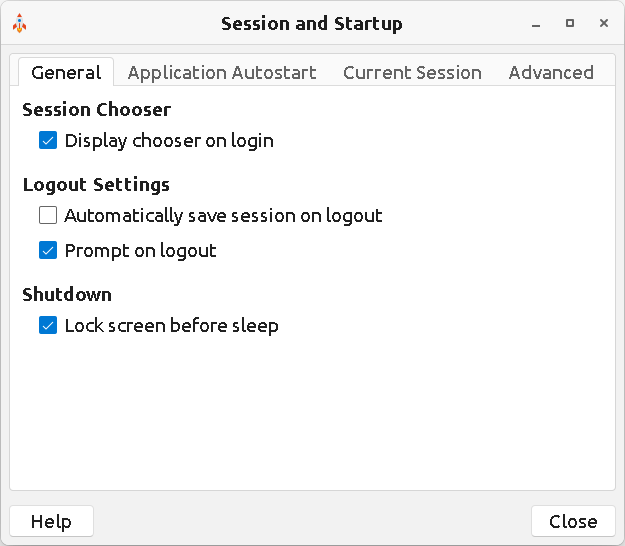
The second tab is called "Application Autostart". Click it.
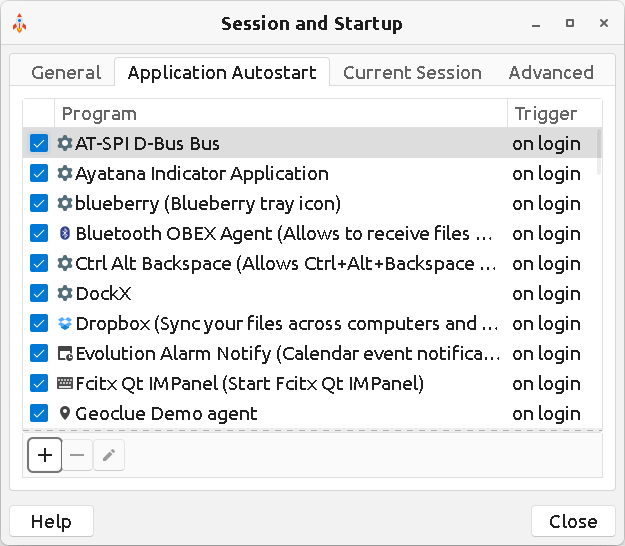
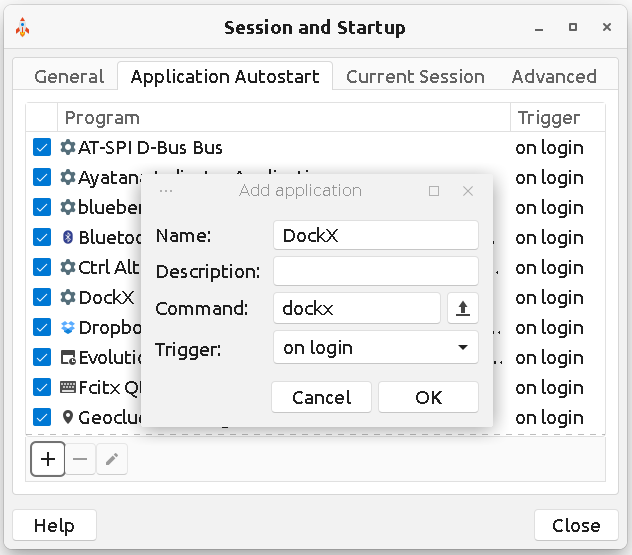
At the very bottom of this page, there is the button with the letter "+". Click it to start adding an application to the list. My list alreay has DockX on it. The idea is to add this application to the list. Type in the following as show in the next screenshot, then click OK.
Then check the list and verify that the application is in the list and you are all set.
This is a sample of my DockBarX running:


This is one of those obscure, yet I try and discovered was do-able kind of things. I can change the icon for the start menu for all applications. What I figured out was that this button is just a program that just popup a list of categorized applications. Since it is a program, I can change its associated icon to something else. I downloaded this horse face SVG icon from the net and set it as the application icon. Here is the icon itself:

Right click on the start menu button to open the context menu, like this:
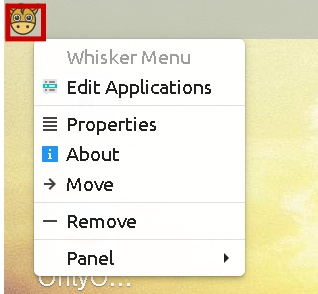
In the context menu click on "Properties". The popup called "Whisker Menu" will appear. There are a couple of tabs at the top of this window. I click the tab called "Panel Button"
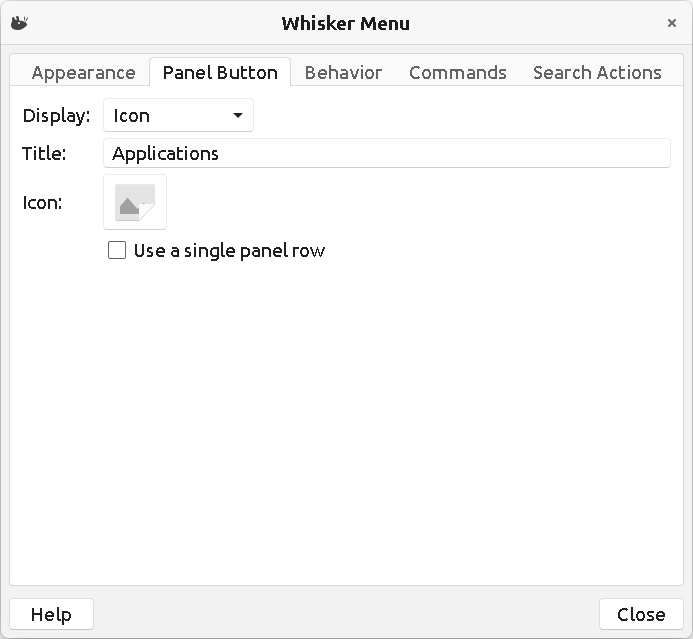
In the middle, the last option is called "Icon", And there is the icon that can be clicked allowing me to pick a different icon to display. Click it and wait a while, the window for selecting an icon will appear:
This is the same window that I used to set the icon for my custom lock screen launcher. Do the same by going to the drop down (the top one called "Select icon from") and select the option "Image files", the window will display this:
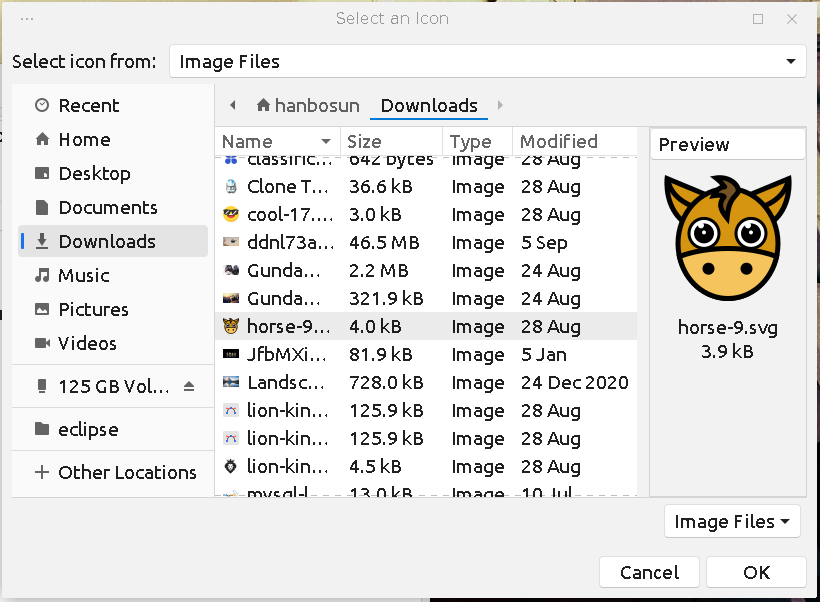
Using this window I can navigate the local file system and pick an icon which I can replace for the start menu on this panel. This is how I change the default blue mouse icon for this "Whisker Menu". It is amazing this kind of customization is available. I wouldn't be able to do the same for Windows.
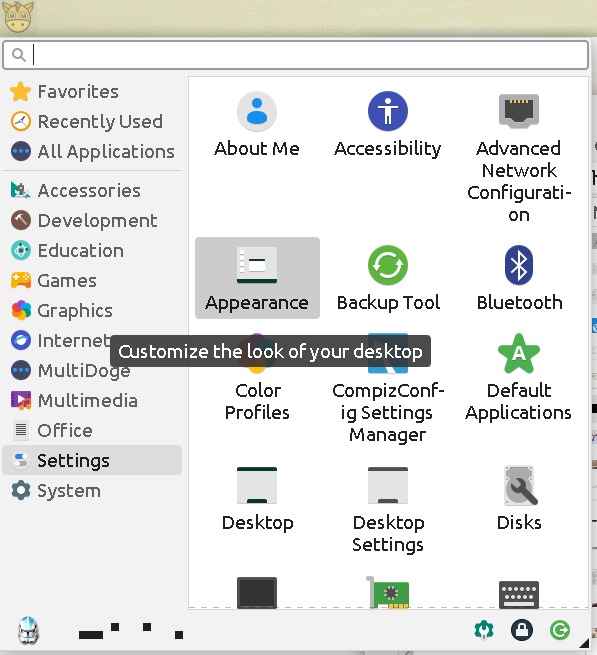
As you have read so far and saw twice that the use of icons, to set application launcher and customize icon for the Whisker Menu. Another thing you can do to your system is getting a new set of icons and have desktop utilize this new set of icons. This requires getting a set of new icons, uncompress the folder, then copy the folder into a designated location. Then it will be available in the "Appearance" application. This is the "Appearance" application.
Before I discuss how to use this app to set the system wide icon usage, I will show you how to install a new set of icons. There are web sites that hosts these files. It would be a compress file that contains lots and lots of SVG files. They can be used to identify applications, or status, or emblems, etc. The site I found is called xfce-look.org. On the left side of this site, you will find a link called Full Icon Themes. Open that link and find the set that is best suited for your taste. Too me, there are not a lot of choices. Most of these icon sets are not complete. The compressed file size is 1 or 2 MB, some of them are 7 MB. These one will have a lot of missing icons and make them impossible to be used. When you install some of these small icon sets, then switch to use them, then a lot of status, or emblem displays will have no icon display. They were very disappointing.
The only one kind of icons set stands out are the ones called "Papirus-XXXXX" icon sets. These icon sets are 27 MB, and included almost all the icons one ever needed. I downloaded a couple of these and installed them. And finally settled with the one called "Papirus-Brown-Light".
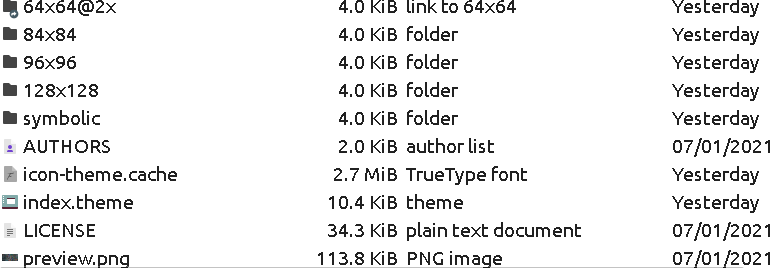
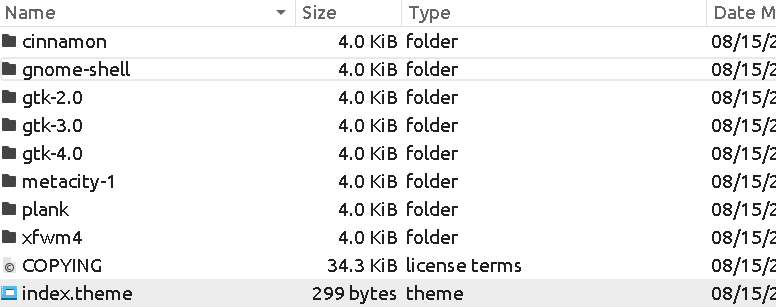
Here is what I did. I download the compressed file. Then uncompressed then in my Download folder. After uncompress, I will use my Thunar File Manager to check the files. In the uncompressed folder, there should be some settings files like:
Here is the uncompressed folders looks like:
If you can see something like this, this icon set is good to be installed. Just run the following command:
sudo mv <folder contains all the icons and settings files> /usr/share/icons/
Here is an example, if I have downloaded and installed the one called Papirus-Breeze-Light-20210901.tar.gz, when I uncompress it, I have a folder called "Papirus-Breeze-Light" in my Downloads folder. And to install it, I would run the following command:
sudo mv Papirus-Breeze-Light /usr/share/icons/
After the command runs successfully, the icons are ready to be used. I open the Appearance application in Settings category. Then click the tab called "Icons". All the icon theme names are sorted in alphabetical order. I scroll to the section where I can find the newly installed icon set. Then click to highlight it:
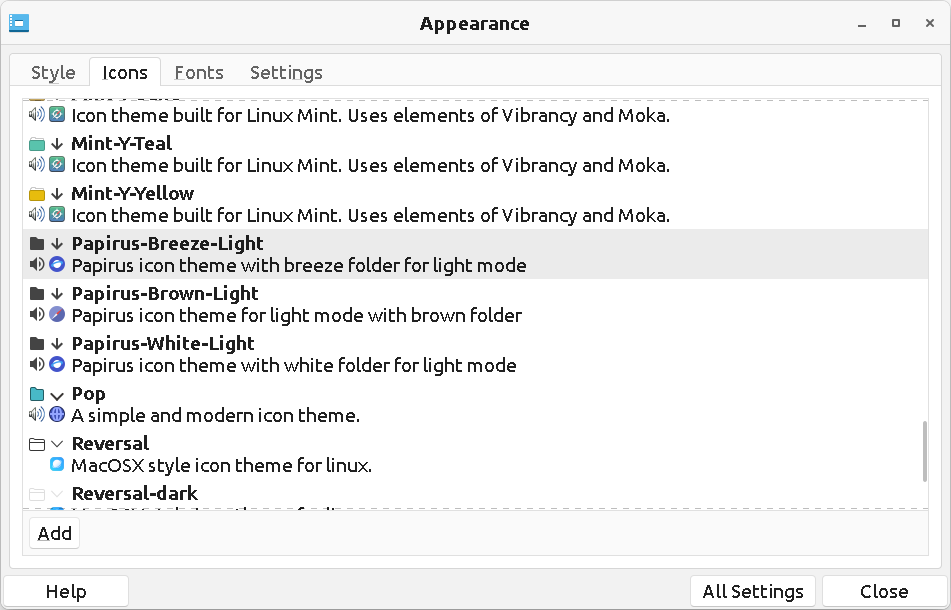
Once I highlight it, it will be the icon set to be used system-wide. Then I can close the Appearance application. If needed, I will use "killall" to close the DockBarX and restart it so that the icons will finally take effect. This is the new DockBarX display after I used the new icon set:

Lastly, I wanted a new theme for the windows, decorations for the application windows that make them unique. The same approach for installing and configuring icon set can be used. However, there is a slight twist for this. I have to set the same windows theme in two difference setting/system applications, or risk the theme look inconsistent.
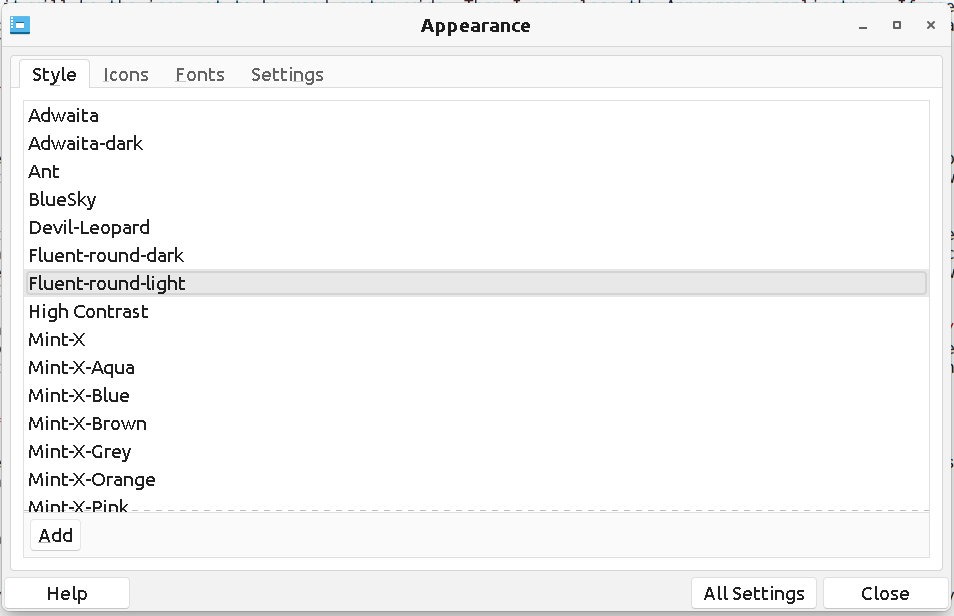
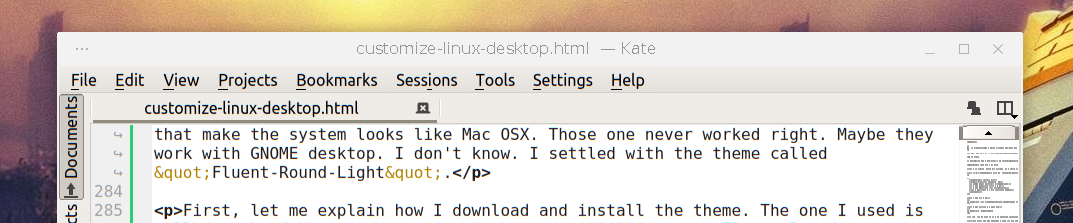
Again, I looked for the windows decoration theme at xfce-look.org. On the left side of the site, there is the link called "GTK3/4 Themes. XFCE windows manager is a derivative of the GNOME desktop so the themes via GTK3/4 will work. There were a lot of choices, but most of them does not work, especially the ones that make the system looks like Mac OSX. Those one never worked right. Maybe they work with GNOME desktop. I don't know. I settled with the theme called "Fluent-Round-Light".
First, let me explain how I download and install the theme. The one I used is called "Fluent-Round-Light". You can click the link to go to the page and download. There were 6 files. One of them is called "Fluent-Round-Light". After uncompress it, I use Thunar File Manager to inspect the uncompressed folder, there should be these files:
If the file structure does not look like this. Then I won't install it. It probably won't work. Once the file structures are verified, I can run the following command to install:
sudo mv <folder contains all the icons and settings files> /usr/share/themes/
For example, if I have uncompressed the theme called "Fluent-Round-Light", I use the following command to copy this to install:
sudo mv fluent-round-light /usr/share/themes/
And that is all I need to do. To verify it was installed, I open the Appearance application (from Settings), and click the tab called "Style", In the list of styles, I can scroll down and see if the new theme is there:
To install it, the first thing I have to do is click it and high light it in this Appearance application. Then close this Appearance application. Next I have to open another system setting application called "Window Manager":
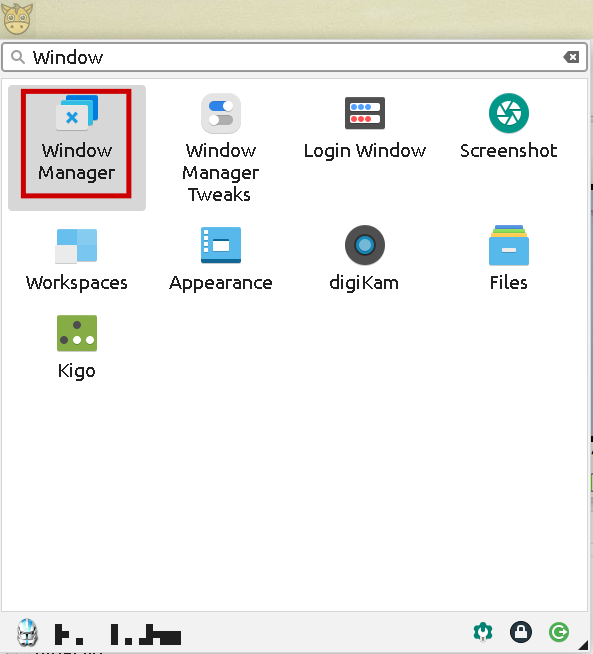
Click that application to start it, then click the Style tab to list all the available style. This is the gotcha. If I don't set the style in this application to the same theme (Fluent-Round-Light), then the window decorations will be inconsistent. There will be two different style intermix and the looks can be weird. This is why I have to set the same theme for both applications. Here is a screenshot of Window Manager sets the same theme:
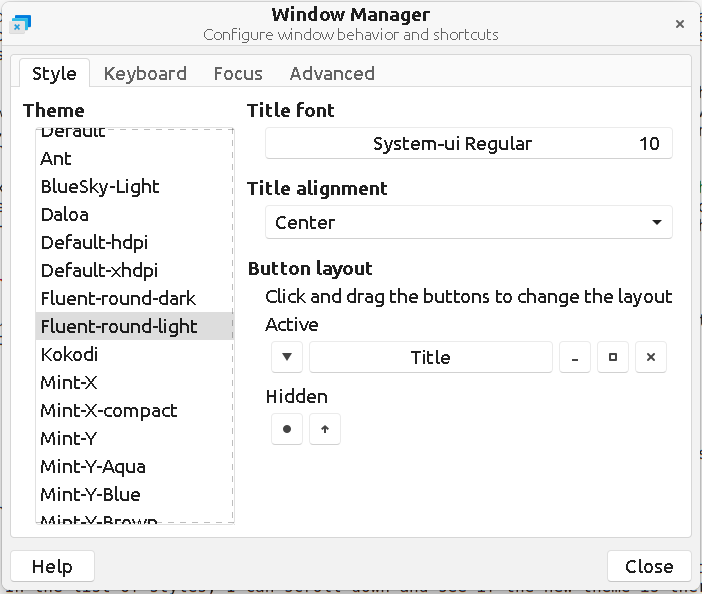
On the same screen, right bottom side, there is the "Button layout" where the buttons and other components on window title bar can be re-arranged. This is how you can have a more Mac OSX look by getting the minimize, maximize, and close buttons to the left. But I like the Windows OS arrangement of title and buttons. So that is the arrangement I chose.
Close both the Appearance application, and the Window Manager application. The application window appearance would look like this:
This tutorial featured a lot of screenshot showing the application windows styles that is using "Fluent-Round-Light" theme. So there is plenty demo as what this theme looks like. I like white or light background with dark ink for text. This is why I choose some bright color icons and bright light color for the theme.
It took a long while to write this tutorial. The hardest part is capturing all the images (37 images). It took a lot more effort to upload and edit this post to be available online (mostly getting the images to the post). It is intended for any beginner and intermediary users as a reference if they want to do the same customization.
Just to summarize all the concepts discussed here:
I hope this is helpful for any readers. If there is any questions, please leave them as comments. Good luck to you.
Guest comment is not allowed for this post.

There is no comments to this post/article.