
Capturing video of game playing is one thing I really wanted to do and just put off because I didn't want to spend the money, like so many other things (buying a console, getting all the games, etc.) I have put off. Just recently, I decided not put hold off this any longer. What I am thinking right now is that I need to learn and experience. After some research, I chose to purchase a video capturing device that can self record, as well as connecting to the PC. It is very hard to find such a device. I was able to find this one called "AverMedia Live Gamer Portable 2 Plus". It supports the functionalities I wanted. The small downside is that this device cost a bit more that the capturing device can only connect to PC.
I had no idea how this device would work. There is very little information about this device online. It was a gamble when I decided to pay for the device. I figure I can play with it and figure out all its secrets. Turn out I was right. When I ordered it, there was the option of free one day shipping. And I got it in less than a day. The device looks weird, like a paper weight. I tried it out at night. Connecting to PC for video recording worked without much of trouble. My laptop is Linux, and the video capture with the device can be done with OBS Studio. I just have to find the correct input source. Once the correct input source is found, I can record or stream it (only if I wanted).
To set it up, I need to get the source video connected to the capturing device. There are two HDMI port on the back of the device. One is the input source, one is for output to the display (TV, monitor, etc.). There is also the USB port (I believe it is USB 3.0). This USB port provides the power, as well as the split output of video/audio data to another capturing device (laptop). When I use the device to do the video capture, I connect the USB port to a USB port on the PS4 console so that it ha power supply. When I use Laptop to save the capturing data, this USB connection goes to the Laptop. On the back, there is the micro-sd slot, where I put my 128 GB micro-sd card in it. On the front, there will be two controlling buttons, the right one is the one determine whether to use device for sole capturing, or let laptop save the videos. I can slide it to the left to use laptop to save the capture, put it in the middle, I can use the big button in the middle of the device to to the sole capturing. I hit the big button, which also serve as status indicator, it turns from solid blue lighting to flashing red, that means it is capturing by itself. And another click, the light turned back to solid blue, and the recording has been saved. The micro-sd card has to be in the FAT format, or the device will display solid red showing you cannot do the capture.
Using laptop to save the capture is just as easy as the sole capturing. Once the USB connection is setup correctly, I can open OBS Studio, make sure all the input sources are removed, then add the new input source with the name of "Video Capture Device (V4L2)". Finding this video source input is fairly easy, there will be a list of all input sources, you can always guess which one it would be, via choice eliminations. This is the only one that shows as a new source, so I would select and see if the large screen would display the source video correctly. If choice elimination is not working, just select everyone of the options and see which one would give you the right input.
Another thing to be aware is that there will be two audio source, the first one would be the input source audio, the audio from the game. The second one is used for you to add comments. If you don't want this, you need to disable it. This ensures whoever is doing the capturing can get the right audio input, either with comments and possibly with back ground noise, or just game audio. It is important to do some experiments.
Using the device for capturing without the PC took me a little longer to figure out. There is a micro-sd slot on the device. And I have bought a 128 GB micro-sd card long before the device. I plugged in and tried the button on the device for instant recording, and it failed to work. I tried several times later and still it failed to work. So I had to do some research, turned out that the sd card was formatted with NTFS not FAT. Once I reformat the sd card, the one-click recording by device is working as expected. So remember, format the sd-card with FAT format then the card can be used for recording.
The hard part is the video editing. It is also time consuming. The device' self recording function will output an *.mov file. I don't need any fancy editing, just need to cut the videos and do some simple conversion. Handbrake and OpenShot Video Editor both are available in Linux. I have tried using OpenShot Video Editor to cut the segment and render the new video, but it would always crash along the way. It was very frustrating. This is why I brought Handbrake into the equation.
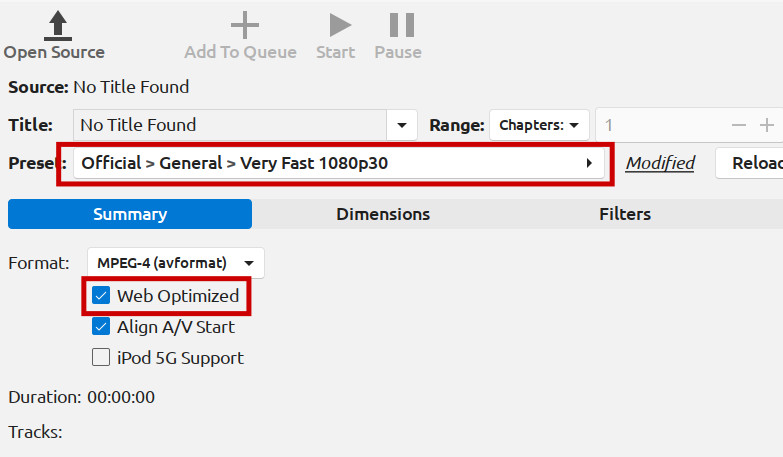
Here is the process that worked for me. First, I have to use Handbrake to shrink the video. First I open the source video, then use the default preset of "Official -> General -> Very Fast 1080p30". And I also check the check box for "Web Optimized". Here is a screenshot:
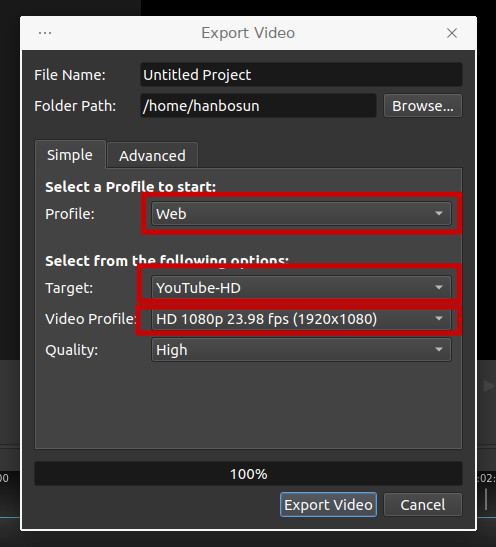
Then I will start the processing. It will generate a m4v file. For some reason, the file when uploaded to YouTube would only generate a low quality post. The next step is either do another conversion using OpenShot Video Editor or using it to do the cutting of the video then convert into the output I wanted. To do the cutting is to use OpenShot Video Editor to split the video. Right click on the source video to popup the context menu, then select "Split Clip". The new popup window can preview the source video clip, and allow you to set the start point, and the end point (the time where to start and stop). And I can create a new clip out of this. Then I will render this new clip as a new video. To render it, I will first add this new clip to the time line at the bottom. There are 4 time line, I will put it on the first one. Finally, I go to menu File and select "Export Video". Another popup would display. On this one, I will select "Web" as the Profile. The Target will be "YouTube-HD". Finally the Quality would be "High". That is all I have to set before I click the button "Export Video". I click the button, and wait for it to complete.
With some experiments I found is that I cannot use OpenShot Video Editor to do all above on the original source video. It will crash on MOV file. I don't know why. By converting the MOV file to m4v file, then use the m4v file for cutting, the crash would disappear. And the quality of the video would be 1080 HD.
This is the end of this tutorial. I hope it can help you with your quest to create HD videos for YouTube. Good luck to you.
Guest comment is not allowed for this post.

There is no comments to this post/article.